The Control Panel. Actions of the participants
The Control Panel of the Meeting Window allows the participants to use different options during the meeting:

Setting the window size
-
By default, the Conference Window is in the standard mode. Click the button:
-

to switch to the full screen mode; -

to exit the full screen mode.
Setting the video layout
-

Switches to Active speaker – click to select layout. Videos from the participants, arranged in the order in which they entered the conference, are displayed according to the mode icon: in 1 upper large window and 8 lower smaller windows. By left-clicking on a participant's name in the list of participants or by clicking on a participant's video, you can select a participant whose video will be displayed in the upper large window. -

Switches to the One speaker layout. The video from one active speaker is displayed (automatically detected). -

Switches to the Active speaker – auto layout. Videos from the participants, arranged in the order in which they entered the conference, are displayed according to the mode icon: in 1 upper large window and 8 lower smaller windows. The upper large window displays a video from one actively speaking participant (automatically detected). -

Switches to the Grid layout. By default, 16 videos from participants are displayed in the order in which they entered the conference. By left-clicking on a participant's name in the list of participants or by clicking on a participant's video, you can select a participant whose video will be displayed in the upper left window.
Configuring devices (microphones, speakers and video cameras)
- In the Meeting Window, it is possible to control devices (microphones, speakers and video cameras) using the following buttons in the Control Panel:

- The Disable microphone / Enable microphone button:
 Press this button to mute/unmute your microphone. Click the ^ arrow next to the button to open options for audio:
- Select a microphone: Allows you to select one of the microphones available on your device.
- Select speakers: Allows you to select one of the speakers available on your device.
- The Enable video / Disable video button:

Click this button to turn on/off your video camera. Click on the ^ arrow next to the button to open options for the video:
•** Select a camera**. Allows you to select one of the video cameras available on your device.
The number of simultaneously enabled microphones
- The situation when several meeting participants turn on their microphones simultaneously is handled with the following rules:
- On entering the meeting, all microphones of all the participants are disabled.
- The order in which the participants enable their microphones is kept.
- The number of participants with enabled microphones is kept.
- On getting the maximum of enabled microphones, the system disables the microphone of the participant who has been the first to enable it, etc.
- The maximum of enabled microphones by default is 5, and it can be changed in the server settings and in the meeting parameters (the Schedule conference tab in the Personal Cabinet).
Viewing the meeting information
After clicking the Information button,

a window with the meeting information opens:
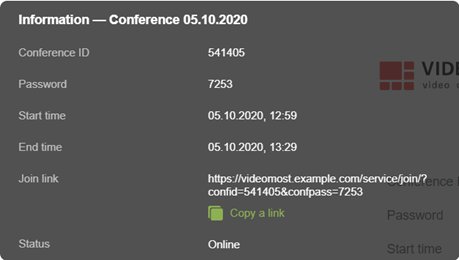
- Conference name at the top of the window;
- Conference ID and password;
- Date / time of the beginning and end of the conference;
- The join link to the meeting. To copy it, click Copy a link;
- Conference status: Online/Offline.
Viewing the list of participants
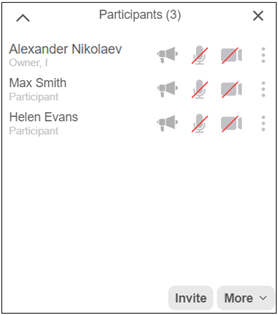
To view the list of the meeting participants, in the Control Panel click the Participants button:

The list of participants in the current conference will open in the Sidebar:
Chat
To open the meeting chat, in the Control Panel click the Chat button:

The chat of the current meeting opens:
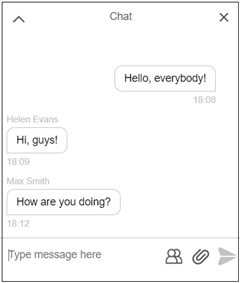
All participants who are not blocked from the chat can leave text messages. The Chat window contains the following controls at the bottom:
-
The Type message here textbox: Allows you to write new messages.
-

Allows you to select a recipient from the participant list if you don’t want all the participants to read your message (the To all option by default). -

Allows you to upload a file into the chat. -

Sends the message which is inside the textbox.
Screen sharing
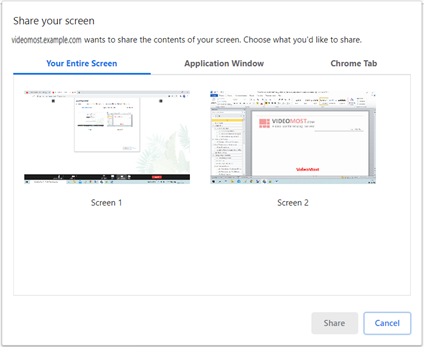
To show other participants your screen, in the Control Panel click the Screen sharing button:
-
You can choose the window to share with the participants using the following menu tabs:
- Your Entire Screen: Show the entire screen which you have chosen from the list: Screen 1, Screen 2, etc.
- Application Window: Show the application window you have chosen from the list of windows of currently running applications.
- Chrome Tab: Show the tab you have chosen from the list of currently open Google Chrome tabs.
Leaving the conference
-
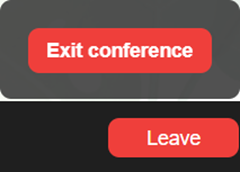
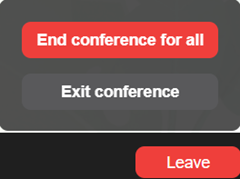
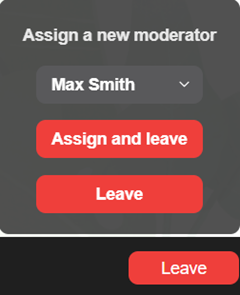
To leave the conference, click Leave the button in the Control Panel to open a menu that has two sets of options:
- there is only one option for the participant in this menu: Exit conference.
- there are two options for the moderator in this menu:
- End conference for all: Ends the conference for all participants.
- Exit conference: The moderator leaves the conference, but the conference continues.

The first star on the left corresponds to 1 point, the second one to 2 points, etc.
If you want to rate the quality of the service, select the star corresponding to the desired
score and click the Send button. If you don't want to rate, click the Leave button.


SPIRIT SOFTWARE LICENSE AGREEMENT
This Software License Agreement (“Agreement”) is made and entered into on the date of the last duly authorized signature below (hereinafter referred to as the “Effective Date”) by and between SPIRIT CORPORATION LIMITED (Office 602, 1st Derbenevskiy lane, 5, Moscow 115114, Russian Federation), hereinafter referred to as "SPIRIT" and the company listed at the top of this Agreement, hereinafter referred to as "LICENSEE".
1. DEFINITIONS
In addition to the terms elsewhere defined in this Agreement, the following terms as used in this Agreement shall have the following meanings:
1. “Licensed Software” means SPIRIT binary, object or where applicable source code computer programs along with their related documentation and a set of Application Programming Interfaces (API) designed for integration of the Licensed Software with LICENSEE Product and service, as laid out in detail in Exhibit A.
2. “Free and/or Open Source Software” (FOSS) means computer programs which have been publicly made available by respective developer communities under license terms and conditions (including but not limited to GNU General Public License (GPL), GNU Lesser General Public License (LGPL), Mozilla Public License (MPL), BSD licenses, the Artistic License, the Netscape Public License, the Sun Community Source License (SCSL), the Sun Industry Standards License (SISL), the Apache License, etc.) as defined and from time to time being corrected, amended, modified and published by respective copyright and/or “copyleft” owners, including but not limited to Free Software Foundation, Open Source Initiative, etc. For the purpose of this Agreement “FOSS” means software components specifically marked as such and specified in Exhibits A and B. For clarity, SPIRIT is not a part of the said developer communities and is not accountable for development, support, delivery or other provisioning of FOSS.
3. “Project Start Date” means the date that the following two conditions have been met:
This Software License Agreement has been signed by both parties: SPIRIT and LICENSEE.
The first payment set forth in Section 3 of Exhibit C has arrived to SPIRIT bank account.
4. “End Customer” means the third party as described in Exhibit E.
2. DELIVERY
The Licensed Software shall be considered delivered upon actual delivery by SPIRIT to LICENSEE of one (1) copy of computer program of the Licensed Software and one (1) copy of related documentation thereof. Such delivery shall take place according the date(s) set out delivery schedule in Exhibit C, subject to timely provisions of LICENSEE deliverables listed in Exhibit B, where applicable.
For the IP security reasons SPIRIT will deliver the Licensed Software deliverables, and LICENSEE/SPIRIT will exchange the portions of Licensed Software deliverables, via electronic delivery (email, ftp and like) in encrypted form using PGP or similar technique.
3. ACCEPTANCE
LICENSEE hereby confirms that LICENSEE has completed all the necessary tests of the Licensed Software and successfully verified compliance of the Licensed Software with specifications as stipulated in Exhibit A and acceptance criteria stated in Exhibit B prior to signing and executing of this Agreement so the Licensed Software should be deemed accepted by LICENSEE as of Effective Date.
After the delivery, LICENSEE’s authorized person will send the delivery confirmation to SPIRIT, according to the form stated in Exhibit D (providing such delivery confirmation is the necessary condition for LICENSEE to get the rights stated in Section 4).
4. LICENSE
4.1. Upon actual receipt by SPIRIT of the full amount of the License Fee in strict accordance with the payment schedule specified in Exhibit C SPIRIT hereby grants to LICENSEE a non-transferable (except as stated in Section 4.6), non-assignable, non-exclusive, internal use only license to use the Licensed Software on up to total number (specified in Exhibit C) of computer's residing on premises of the End Customer in the binary form, complete and unmodified, for the sole purpose of internal use by the End Customer.
LICENSEE must not and has no right to:
- sell, license, distribute or market the server-side part of the Licensed Software neither as a standalone software product, nor bundle or integrate the server-side part of the Licensed Software with any software or hardware products other than specified in Exhibit B.
- offer the Licensed Software or remote access to the Licensed Software for use to any third party.
SPIRIT may revoke the license and terminate the agreement if LICENSEE fails to make the License Fee payment according to the payment schedule and payment terms specified in this agreement (SPIRIT will give LICENSEE 5 days written notice).
4.2 All other rights are reserved to SPIRIT.
To protect SPIRIT’s rights in the Licensed Software provided to LICENSEE in an object code only format, LICENSEE agrees that it will not “unlock”, reverse engineer, decompile, disassemble or otherwise translate any such object code portions of Licensed Software to a human-perceivable form nor permit any person or entity under its employ or control to do so.
4.3 LICENSEE has no right to create any derivative works on the basis of the Licensed Software or any inner functional part of Licensed Software.
4.4 LICENSEE does not get any rights to the Licensed Software unless and until the license fee specified in Section 6.1 is fully paid by LICENSEE to SPIRIT.
4.5 Except specified in 4.6, LICENSEE must not and is not granted the right to sub-license the Licensed Software to any other party.
4.6 LICENSEE has the right to transfer the licenses for the Licensed Software received under this Agreement to the End Customer, explicitly stated in Exhibit E (“End Customer”). LICENSEE must sign the license agreement with the End Customer, which includes at least each and every license and usage limitations stated in this Agreement, and provide SPIRIT with the copy of such license agreement. Failure to provide SPIRIT with the copy of such license agreement constitutes the material breach of this License Agreement and may cause the license revocation by SPIRIT.
4.6.1 Upon written request of LICENSEE, SPIRIT will provide LICENSEE the keyfile for the one internet domain specified by LICENSEE, in order to provide such keyfile to and only to the End Customer. SPIRIT will provide such keyfile only once and for only one internet domain.
4.6.2 The verification of the name and any other data of the End Customer is performed by LICENSEE. SPRIT is not responsible for the accuracy of correctness of the data of the End Customer specified by LICENSEE, and SPIRIT obligations are deemed performed in full once SPIRIT has provided LICENSEE with the keyfile according to the End Customer’s data provided by LICENSEE.
4.6.3 Immediately upon the transfer of the license for the Licensed Software to the End Customer, LICENSEE loses each and every right to the Licensed Software.
5. INTELLECTUAL PROPERTY RIGHTS
5.1 All intellectual property rights (including, without limitation, patents, ideas, discoveries, formulae, trade secrets, inventions, improvements and copyrights), except patents which are Necessary, to the Licensed Software shall remain the property of SPIRIT. LICENSEE may be required to obtain a licence from IP holders for certain international standards.
5.2 All rights not expressly granted are reserved by SPIRIT.
5.3 SPIRIT reserves the right to grant any license to the Licensed Software to any other parties in any country.
6. LICENSE FEE
6.1. LICENSEE agrees to pay to SPIRIT the amount specified in Exhibit C as the fee for the deliverables to LICENSEE under Sections 2 and for the licenses granted under Section 4 above. LICENSEE shall pay the license fee in accordance with the payment schedule laid out in Exhibit C.
6.2. The payments by LICENSEE to SPIRIT hereunder shall be made in US Dollars by means of wire transfer to the bank account specified by SPIRIT.
6.3. All fees payable hereunder shall be as indicated in Exhibit C and shall be paid by LICENSEE as invoiced by SPIRIT within five (5) days after receipt of SPIRIT invoice. In case LICENSEE fails to provide SPIRIT with copies (faxed, etc.) of the bank documents proving that the due payment has been wired to SPIRIT bank account within these five (5) days, LICENSEE will be obliged to pay to SPIRIT 2% of the license fee specified in Section 6.1 above for each week of the payment delay. In case of any discrepancy between the payment terms stated in this Agreement and any purchase order(s) issued or internal payment procedures practiced by LICENSEE, the terms of this Agreement will prevail. LICENSEE hereby acknowledges that SPIRIT may delay the performance of its obligations (including but not limited to Licensed Software delivery) if LICENSEE delay the performance of its payment obligations stated in this Agreement.
6.4. In the event that LICENSEE’s Government requires LICENSEE to withhold a tax from the payment of the fees specified in Section 6.1 above, LICENSEE shall add such tax to the said payments and pay it to the appropriate tax authority, so that SPIRIT gets exactly the amounts specified in Section 6.1. SPIRIT shall be solely responsible for all taxes payable outside LICENSEE’s country of incorporation.
7. COPYRIGHT
Software is copyright SPIRIT. LICENSEE must not sell Licensed Software as a stand-alone software product. LICENSEE agrees that it will not remove copyright notices or proprietary markings of SPIRIT from the Licensed Software.
Upon signature of this Agreement, with review and written approval by LICENSEE, which should be provided to SPIRIT within maximum 2 weeks after submission, SPIRIT may issue a press release to publicly announce the fact that LICENSEE purchased Licensed Software from SPIRIT, including the name of the End Customer and the fact that the license is being transferred to the End Customer.
LICENSEE will provide an official reference by LICENSEE’s officials containing at least 3 sentences which LICENSEE will allow SPIRIT to use in whatever customer opportunities, including placing this reference on publicly available SPIRIT web site. LICENSEE will give this reference to SPIRIT after Licensed Software acceptance by LICENSEE.
8. SOFTWARE SUPPORT
8.1. Until the expiration of 30 (thirty) days period after the Project Start Date, SPIRIT agrees to provide, at no charge to LICENSEE, up to five (5) hours of technical consultation (by telephone, e-mail or other means designated by SPIRIT) on the Licensed Software. Further support will be accomplished at $250 per 1 man-hour. Minimum 8 man-hours may be bought at each time.
8.2. Technical support subscription.
a. Upon payment of the Technical support subscription fee for the term as both (the fee and the term) set forth in Exhibit C (non included in the License Fee); and
b. Automatically renewed for subsequent term as set forth in Exhibit C:
i. Unless either party gives written notice of termination at least forty-five (45) days prior to the expiration of the then current term;
ii. No renewal shall be effective unless the Technical support subscription fee is duly paid to SPIRIT; and
iii. The fee for the renewal of the Technical support subscription shall be due and payable prior to the expiration date of the then current term as set forth in Exhibit C.
iv. In the event that LICENSEE elects not to renew the Technical support subscription, any reinstatement of the Technical support subscription shall be subject to payment to SPIRIT of all Technical support subscription fees that would have been payable from the date that LICENSEE discontinued the Technical support subscription to the date of its reinstatement.
v. SPIRIT reserves the right to make adjustments to the amount charged for the Technical support subscription on a year by year basis, provided that any such change shall be communicated in writing to LICENSEE at least sixty (60) days prior to the expiration date of then-current term of the Technical support subscription.
vi. Support. SPIRIT obligations under section 8.1 will be extended to the term as set forth in Exhibit С with the number of hours of technical consultation to be increased to fifty (50).
vii. Updates. SPIRIT will provide software updates for Licensed Software during the term of the Technical support subscription as set forth in Exhibit С free of charge to the LICENSEE as soon as such software updates are available.
viii. SPIRIT reserves the right to create new applications. SPIRIT shall have the sole discretion to determine the update fee or charge for such new applications, and terms and conditions of licensee’s use of all such new applications.
ix. All software defects that SPIRIT determines not to be directly attributed to the License Software, or that occur outside the term of Technical support subscription as set forth in Exhibit C, shall be considered as requests for custom software enhancement programming, which shall be contracted for under a separate agreement at established commercial rates.
x. SPIRIT shall not be responsible for providing software Upgrades services to correct any software anomalies resulting from modifications, enhancements, or other alterations made to the software by anyone other than SPIRIT’s qualified support staff.
8.3. Custom Modification may be required by LICENSEE at $8,000 to $10,000 per man-month (minimum 1 man-month may be purchased at each time). Cost of such modifications will be negotiated in good will of both parties.
8.4. The Licensed Software and documentation is provided on an "as is, as available" basis, without warranty of any kind. The Licensed Software is supplied with the standard documentation and to the maximum extent permitted by applicable law, SPIRIT further disclaims all warranties, including without limitation any implied warranties of merchantability, fitness for a particular purpose. The entire risk arising out of the use or performance of the product and documentation remains with LICENSEE.
9. COSTS AND EXPENSES
If LICENSEE requests SPIRIT technical support or software integration specialists to arrive to LICENSEE’s premises, LICENSEE will pay to SPIRIT in addition to the License Fee, a development fee of $12,000 per each man-month spent at LICENSEE’s premises (or a pro-rata amount for parts of the month, based on 21 working days a month), as well as appropriate travel and accommodation costs.
10. EMPLOYMENT BY LICENSEE
LICENSEE acknowledges that SPIRIT Corp and SPIRIT Technologies employees assigned to provide Services to LICENSEE are party to an employment commitment with SPIRIT. LICENSEE agrees that any such employee shall not be offered employment by LICENSEE for a period of one (1) year from the time such employee leaves the employ of SPIRIT unless permission is granted by SPIRIT. If LICENSEE does offer employment to a SPIRIT employee and the employee accepts the employment offer of LICENSEE, LICENSEE will pay to SPIRIT $300,000 (three hundred thousand US Dollars) after the employee has been in the employ of LICENSEE for four (4) weeks.
11. CONFIDENTIALITY
11.1 In connection with this Agreement, certain information, data and material of a proprietary nature, both technical and financial, may be transmitted from one party to the other. For the purpose of this Agreement, any such information, data and material disclosed by one party to the other which is in writing and appropriately marked as being proprietary, or which is disclosed orally or visually and designated as proprietary at the time of such disclosure and is confirmed in writing as being proprietary within thirty (30) days after such disclosure will be deemed to be proprietary information of the disclosing party, and the recipient party agrees that it will keep such information in confidence using the same degree of care that it would normally use in protecting its own proprietary information. The recipient party further agrees not to use such proprietary information for any purpose whatsoever other than the purpose of this Agreement, without the prior written approval of the disclosing party. The foregoing restrictions on use and disclosure of proprietary information shall not apply:
- if such information is or becomes available to the public through no fault of the recipient party;
- if such information is known by the recipient party prior to its receipt from the disclosing party;
- if such information is disclosed with the written approval of the disclosing party;
- if the recipient party lawfully obtains such information from a third party without any confidentiality obligation; or
- if such information is at any time developed by the recipient party independently of any disclosure of the disclosing party.
- if a recipient becomes compelled by law or court order to disclose Confidential Information of the discloser, the recipient will provide the discloser with prompt notice of such requirement so the discloser may seek a protective order or other appropriate remedy. If such protective order or other remedy is not obtained, the recipient agrees to furnish only that portion of the confidential Information that it is advised by legal counsel is required by applicable law or court order, and such disclosure will not result in any liability hereunder.
11.2 Notwithstanding the above, for the purpose of this Section 11, LICENSEE agrees that the Licensed Software in a source code format shall be deemed to be proprietary information of SPIRIT even if not marked as such.
11.3 Notwithstanding anything contained herein, LICENSEE may disclose proprietary information disclosed by SPIRIT hereunder to any of its subsidiaries to the extent necessary for the purposes of this Agreement, provided that prior to such disclosure LICENSEE shall impose on such subsidiary companies confidentiality obligation similar to those contained herein.
12. TERM AND TERMINATION
12.1 This Agreement shall become effective as of the Effective Date and shall remain in full force and effect for three (3) years or until terminated by one of the parties pursuant to Section 12.2 below.
12.2 Either party may, without prejudice to any other remedy, immediately terminate this Agreement by giving a written notice of termination to the other party in the event that:
(1) the other party is adjudicated bankrupt, becomes insolvent, makes a general assignment for the benefit of creditors, or enters dissolutions or liquidation proceedings;
(2) a petition is filed against the other party under a bankruptcy law, a corporate reorganization law or any other law for the relief of debtors and such petition is consented to or is not dismissed within sixty (60) days of filling; or
(3) the other party commits any material breach of this Agreement and such breach is not cured within thirty (30) days after the written notice of such breach to the other party.
12.3 Upon termination of this Agreement, all licenses and rights granted by each party to the other under this Agreement shall cease forthwith, and each party shall destroy the confidential information furnished by the other hereunder and all copies thereof then in its possession, provided that LICENSEE may retain and use the Licensed Software in accordance with provisions of Sections 4 and 5 above, but only if LICENSEE has paid to SPIRIT the full amount of the License Fee according to clause 6.1 of this Agreement.
12.4 In the event that this Agreement is terminated by LICENSEE prior to LICENSEE's acceptance of the Licensed Software and payment of the full License Fee as defined in Section 6, LICENSEE shall have no license to use or have used the Licensed Software.
12.5 The provisions of Sections 5, 6, 10, 11 (but limited to ten (10) year period from the termination of this Agreement), 12.3, 12.5, 14, 15, 16 and 20 shall survive any termination of this Agreement.
13. NOTICES
All notices or other communications required or permitted to be given hereunder shall be made in writing and in the English language, and shall be sent by airmail, postage prepaid, by facsimile or by hand delivery, in each case effective upon receipt of the airmail, facsimile or hand delivery by the addressee, as follows:
If to SPIRIT: SPIRIT Corporation
Attention: President
Facsimile: +7-495-912 6786
ceo@spiritdsp.com
If to LICENSEE: information listed at the top of this agreement
Either party may change its own address for notice by giving a written notice to the other in the same manner described above.
14. ARBITRATION
In the event of any dispute arising out of or in connection with this Agreement between the parties hereto, each party shall exert its best efforts for an amicable resolution, based upon mutual consultation between the parties in good faith. In the event such dispute cannot be settled by mutual consultation within thirty (30) business days after written notification by one party of the existence of such dispute, then any dispute, controversy or claim which may arise out of or in connection with the Agreement or the entering into force, conclusion, alteration, execution, breach, termination or validity thereof, shall be first settled by arbitration at the International Commercial Arbitration Court (ICAC) at the Chamber of Commerce and Industry of the Russian Federation in accordance with its applicable regulations and rules. Such arbitration shall be conducted in English language. It shall not be allowed to submit a motion to a state court to make a decision on the lack of jurisdiction of an arbitral tribunal in connection with the issuance by the arbitral tribunal of a separate order on existence of jurisdiction as a matter of preliminary nature. The award rendered by the arbitrators shall be final and binding upon both parties. The non-prevailing party shall reimburse the prevailing party for all attorneys' fees and costs (including the costs of experts, evidence, and counsel) and other costs relating to arbitration (including without limitation mediation, litigation or any similar action), in addition to all other entitled relief, including damages and injunctive relief.
15. COMPLIANCE WITH LAWS
Nothing herein shall be construed as requiring SPIRIT or LICENSEE to take any action contrary to any export or import control or other applicable laws and regulations of and any other country having competent jurisdiction.
16. GOVERNING LAW
This Agreement shall be governed by and construed in accordance with the Laws of the Russian Federation without giving effect to the principles of conflict of laws.
17. NO ASSIGNMENT
Neither party shall assign any right or delegate any right and obligation under this Agreement to any third party without the prior written consent of the other party, however SPIRIT can assign the right to receive payment and provide support to the Licensee to its Affiliate. The foregoing shall not be construed as restricting LICENSEE from subcontracting any work hereunder to its subcontractors. The foregoing shall not be construed as restricting SPIRIT to assign all the rights and duties under this agreement to an entity that acquires substantially all assets of SPIRIT.
18. SUCCESSOR BOUND
This Agreement shall bind the parties, their heirs, executors, administrators, successors and permitted assignees.
19. NO AGENCY
No agency, partnership, joint venture or employment is created between the parties as a result of this Agreement. Neither party is authorized to create any obligation, express or implied, on behalf of the other party, nor to exercise any control over the other party's methods of operation.
20. LIMITATION OF LIABILITY
In no event shall SPIRIT or LICENSEE be liable to the other for incidental, consequential, indirect or special damages or loss of profit arising out of or in connection with this Agreement, even if it has been advised of the possibility of such damages.
21. FORCE MAJEURE
Neither party shall be held responsible for failure to perform its obligations under this Agreement due to act of God, strike, fire, flood or any other cause beyond the party's control.
22. COUNTERPARTS
This Agreement may be executed in one or more counterparts with the same force and effect as if only one original copy thereof had been signed by all of the parties hereto.
23. HEADINGS
The headings in this Agreement are inserted for convenience of reference only and shall not affect, modify, define, or limit any interpretation of this Agreement.
24. SEVERABILITY
If it is held by a court or other lawful authority of competent jurisdiction that any provision of this Agreement or part thereof is void, illegal, invalid or unenforceable, then such provision or part shall be deemed stricken, and remaining provisions shall be severable and remain valid in full force and effect, unless such partial nullity changes the intent of the parties at the time of the making of this Agreement materially.
25. WAIVER AND AMENDMENT
No waiver, amendment or modification of any provision of this Agreement shall be effective unless in writing and signed by the party against whom the waiver, amendment or modification is sought to be enforced. No failure or delay by either party in exercising any right, power or remedy under this Agreement shall operate as a waiver or such right, power or remedy. No waiver of any term, condition or default of this Agreement shall be construed as a waiver of any other term, condition or default.
26. OFFICIAL TEXT
The official text of this Agreement shall be in the English language, and any interpretation or construction of this Agreement shall be based solely on the English language official text.
27. ENTIRE AGREEMENT
This Agreement, including all exhibits referred to herein, is the entire agreement between the parties hereto relating to the subject matter hereof, and supersedes any prior agreement, understanding and negotiation whether written or oral, relating to such subject matter. No variation or modification of this Agreement nor waiver of any of the terms and provisions hereof shall be deemed valid unless in writing and signed by the parties hereto.
28. ORDER OF PRECEDENCE
In case of any discrepancy between this Agreement and its technical Exhibits, or between this Agreement and any purchase order(s) that LICENSEE may issue to SPIRIT in respect to this Agreement, the Agreement text will prevail.
IN WITNESS WHEREOF, the parties hereto have caused this Agreement to be executed in duplicate by their duly authorized representatives, each party keeping one executed copy hereof.
SPIRIT LICENSEE: By: ______________________ Name: ___________________ Title: _____________________ Date: ____________________ Attachments: Exhibit A – Licensed Software Deliverables Exhibit B – Technical Specifications Exhibit C – Payment Terms Exhibit D – Delivery Acknowledgement Exhibit E – End Customer Information